SUMOチュートリアル「TraCI4Traffic Lights」
オンラインでシミュレーションの値の取得や状態の変化を行うことができる機能「TraCI (Traffic Control Interface)」を使ったチュートリアルを行ったので記録しておきます.
TraCIは,TCPで制御する側(クライアントと言ったりコントローラと言ったりする)とSUMO間のメッセージを行います.
このチュートリアルでは制御する側はPythonのスクリプトで書き,シミュレーションの値を取得したり,指示を送ったりします.
C++, Python, Javaにはデータからメッセージを作成するクラスが用意されています.
実際のコードは, <SUMO_HOME>/docs/tutorial/traci_tls もしくは,<SUMO_HOME>/tests/complex/tutorial/traci_tls にあります.(自分のSUMOのバージョン0.32.0では前者の方でした.)
やること
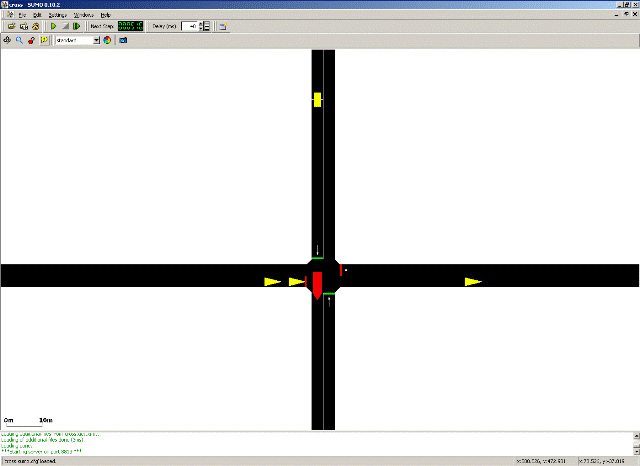
北から南へ電車が,東西を車が通行する状況において,「電車が通行するときは,東西の信号を赤にし,車の通行を止める」といった動作ができるようにします.

python runner.py
で,シミュレーションを実行することができます.
解説
runner.py のコードを見ていきます.
内容としては,
- TraCIのインポート
- ルートファイル(車両の発生,経路の設定が記述されている)の生成
- TraCIによる通信(信号の制御)方法の定義
- シミュレーションの設定,実行
となります.
TraCIのインポート
Python用に用意されているTraCIのライブラリへのパスの設定,インポートを行います.
from __future__ import absolute_import
from __future__ import print_function

import os
import sys
import optparse
import subprocess
import random

# Python用に用意されているTraCIのライブラリへのパスを設定する
try:
    sys.path.append(os.path.join(os.path.dirname(
        __file__), '..', '..', '..', '..', "tools"))  # tutorial in tests
    sys.path.append(os.path.join(os.environ.get("SUMO_HOME", os.path.join(
        os.path.dirname(__file__), "..", "..", "..")), "tools"))  # tutorial in docs
    from sumolib import checkBinary  # noqa
except ImportError:
    sys.exit(
        "please declare environment variable 'SUMO_HOME' as the root directory of your sumo installation (it should contain folders 'bin', 'tools' and 'docs')")

# TraCIの機能を使うためにインポート
import traci
ルートファイルrou.xmlの作成
SUMOは,道路ネットワークファイルのnet.xml と車両の経路を設定したルートファイルrou.xml を用いてシミュレーションを行います.net.xml は事前に作成されているので,rou.xml を作成します.
def generate_routefile():
    random.seed(42)  # make tests reproducible
    N = 3600  # number of time steps
    # demand per second from different directions
    pWE = 1. / 10
    pEW = 1. / 11
    pNS = 1. / 30 #30秒ごとに電車が発生する
    # xml形式での記述
    with open("data/cross.rou.xml", "w") as routes:
        print("""<routes>
        <vType id="typeWE" accel="0.8" decel="4.5" sigma="0.5" length="5" minGap="2.5" maxSpeed="16.67" guiShape="passenger"/>
        <vType id="typeNS" accel="0.8" decel="4.5" sigma="0.5" length="7" minGap="3" maxSpeed="25" guiShape="bus"/>

        <route id="right" edges="51o 1i 2o 52i" />
        <route id="left" edges="52o 2i 1o 51i" />
        <route id="down" edges="54o 4i 3o 53i" />""", file=routes)
        lastVeh = 0
        vehNr = 0
        for i in range(N):
            if random.uniform(0, 1) < pWE:
                print('    <vehicle id="right_%i" type="typeWE" route="right" depart="%i" />' % (
                    vehNr, i), file=routes)
                vehNr += 1
                lastVeh = i
            if random.uniform(0, 1) < pEW:
                print('    <vehicle id="left_%i" type="typeWE" route="left" depart="%i" />' % (
                    vehNr, i), file=routes)
                vehNr += 1
                lastVeh = i
            if random.uniform(0, 1) < pNS:
                print('    <vehicle id="down_%i" type="typeNS" route="down" depart="%i" color="1,0,0"/>' % (
                    vehNr, i), file=routes)
                vehNr += 1
                lastVeh = i
        print("</routes>", file=routes)
TraCIによる通信の定義
シミュレーションのステップ毎にTraCIによりSUMOと通信を行い,車両の位置情報の受信,信号の制御命令の送信を行います.
net.xmlの中で次のように信号の状態を定義しています.この信号はID"0"が割り振られいます.Gが緑,rが赤,yが黄色で,信号の色を表しており,左から順に北東南西の信号です.
<tlLogic id="0" type="static" programID="0" offset="0">
    <phase duration="31" state="GrGr"/> <!-- index=0 -->
    <phase duration="6" state="yryr"/> <!-- index=1 -->
    <phase duration="31" state="rGrG"/> <!-- index=2 -->
    <phase duration="6" state="ryry"/> <!-- index=3 -->
</tlLogic>
この信号の定義をもとに,信号を制御しています.TraCIのPythonのAPIについては,こちらに詳しく載っています.
def run():
    """execute the TraCI control loop"""
    step = 0
    # ID"0"のこの信号のindex=2の状態に信号を設定しています.つまり東西の信号を青にしています.
    traci.trafficlight.setPhase("0", 2)

    # traci.simulation.getMinExpectedNumber()で,道路ネットワーク上にある車両の数と,まだ開始を待っている車両の数を返します.
    # これが0より大きいときに traci.simulationStep()でシミュレーションを1ステップごと実行します.
    while traci.simulation.getMinExpectedNumber() > 0:
        traci.simulationStep()
        # 現在の信号の状態 (indexの値) が2の場合に
        if traci.trafficlight.getPhase("0") == 2:
            # 信号のある交差点上に車両が
            if traci.inductionloop.getLastStepVehicleNumber("0") > 0:
                # いる場合は
                traci.trafficlight.setPhase("0", 3)
            else:
                # それ以外の場合は,東西の信号が青(index=2) の状態を維持する
                traci.trafficlight.setPhase("0", 2)
        step += 1
    traci.close()
    sys.stdout.flush()
このようにTraCIを使い,現在のシミュレーション上の車両の状態を取得し,それによって信号を制御しています.
シミュレーションの実行
シミュレーション時にGUIを使用するかや,TraCIを起動したときに実行するファイルの設定などを行い,シミュレーションを実行します.
def get_options():
    optParser = optparse.OptionParser()
    optParser.add_option("--nogui", action="store_true",
                         default=False, help="run the commandline version of sumo")
    options, args = optParser.parse_args()
    return options


# this is the main entry point of this script
if __name__ == "__main__":
    options = get_options()

    # this script has been called from the command line. It will start sumo as a
    # server, then connect and run
    if options.nogui:
        sumoBinary = checkBinary('sumo')
    else:
        sumoBinary = checkBinary('sumo-gui')

    # first, generate the route file for this simulation
    generate_routefile()

    # this is the normal way of using traci. sumo is started as a
    # subprocess and then the python script connects and runs
    traci.start([sumoBinary, "-c", "data/cross.sumocfg",
                             "--tripinfo-output", "tripinfo.xml"])
    run()
まとめ
TraCIでは,こちらのようにTCPベースで通信の規定が細かく決まっていますが,Python用に用意されたライブラリを用いることで,直感的に使うことができます. C++, Python, Java以外のTraCIのクラスが設定されていない言語を使うときは,TCPの通信のプロトコルをチェックして使う必要があります. TraCIを使うことで,オンラインでシミュレーションの状態の把握や制御ができるようになります.